
Gotta Start Somewhere! - InDesign Quick Start Guide [Membership Preview]
General Comments Applicable to All Layouts
We will be using the “Essentials Classic” workspace for all layouts
To get this go into “Window > Workspace > Essentials Classic”
When fonts aren’t inherently available to Adobe CC, you can replace them with the Futura/Lato family of fonts and it will have a similar effect.
Common Commands that are always used:
Pan - Space + Left Mouse Button (LMB)
Zoom - Alt/opt + Mouse Scroll Up/Down
Preview - W
Type Tool - T
Rectangular Frame Tool - F
Rectangle Tool - M
Pen Tool - P
EyeDropper Tool - I
Video Summary:
1. Creating a New Document:
Open Adobe InDesign and create a new document.
Choose the unit of measurement (e.g., inches).
Select the page size (e.g., 8.5 by 11 inches).
Set page orientation (portrait or landscape), facing pages, and adjust columns, gutters, and margins if needed.

2. Navigating the Interface:
Use the Space key to pan the canvas.
Hold Alt (or Command on Mac) and scroll with your mouse wheel to zoom in and out.
3. Exploring the Tools:
Familiarize yourself with the various tools on the left toolbar, such as the select tool, direct select tool, zoom tool, and stroke/fill settings.
Here are some of the most useful tool that we’ll be using all the time.

Useful Tools to Get Familiar With
4. Managing Pages and Master Pages:
Create new pages using the "Create a New Page" option.
Delete, duplicate, or move pages by right-clicking on them.
Understand the concept of parent (previously called “Master”) pages, which allows you to apply elements to multiple pages simultaneously.

5. Working with Layers:
Activate the layers panel by going to "Window" and selecting "Layers."
Create new layers, delete layers, and rename them.
Utilize layers to organize and control elements within your design.

6. Importing Images and Text:
Create image frames using the rectangle frame tool.
Drag and drop images into the frames.
Adjust image fitting options (proportional or frame proportionally) to fit images within frames.
Alternatively, drag and drop images directly onto the page to create frames automatically.
Use the typography tool to add and format text elements like titles and paragraphs.
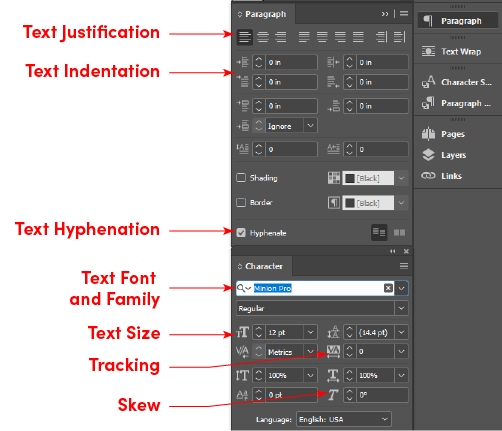
7. Text Formatting:
Adjust font properties such as typeface, size, letter spacing, and line spacing.
Use the paragraph options to justify text alignment and set indents.
8. Styling Text:
Change text color, outline, and stroke properties.
Experiment with text appearance to achieve desired effects.

9. Composition and Layout:
Organize your content on the page by placing text and images.
Adjust element placement for a balanced composition.
10. Exporting Your Design: - Go to "File" and select "Export" to save your design. - Choose the export format and destination folder.
